| Super Cooler
Audible Overhead Alarm
| Contents | Installation | Function | Setup Adjust | Notes | Examples |
| E2C AUTO TEMPERATURE DETECTION / CONTROL COMPUTER COOLER |
OWNER'S GUIDE
- Contents :
Every unit has supplied the accessories listed hereunder
- E2C Auto Temperature Detection/Control Computer Cooler
- Sensor
- Battery
- Heat Resistance Tape
- Power Supply Connector
- Wires
- Owner's Guide
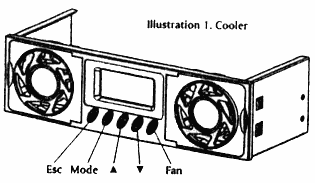
| 
|
- Installation :
The installation of E2C Super Cooler to be proceeded at the following steps
- Take a piece of insulator out from the battery holder.
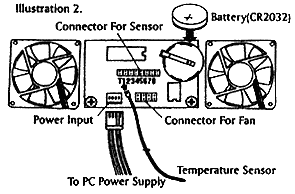
- Connect the temperature Sensor to the main unit
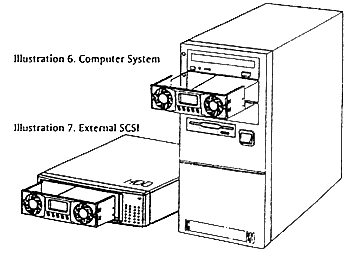
- Install E2C main unit into the slot of the computer case or external SCSI (pulse refer to the illustration 6.)
- Connect to the PC power supply (pulse make sum the positive input is correctly connected)
- Attaching the temperature Sensor to CPU or HDD...(please refer the illustration 4.)
- Timer and temperature control setup
| 
|
- Function :
E2C Cooler is programmed to detect the computer temperature up to 8 channels(sensors) at the same time. The temperature of fan activating can be setup by user his-self, once the computer temperature reach the fan setup, the fan will be automatically activated to decrease the temperature. The alarm will sound to warn if the computer temperature is still up and 5°C over than fan setup. Double protection to avoid any damage caused by over heat for your investment-computer system. 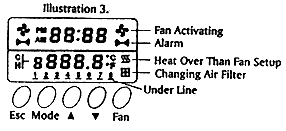
- Time indication
- Fan indication
- Press button to activate, press button again to stop
- Temperature indication
- Press
 to indicate the temperature of last channel to indicate the temperature of last channel
- Press
 to indicate the temperature of next channel to indicate the temperature of next channel
- Channels indication
- No under lined - this channel has not been installed
- with under lined - this channel has been installed with sensor
- under line blinking - over heat (5°C over than the Fan setup)
- Setup Adjust :
 Time display Time display
Temperature display
- press button once
1:Time adjust
  press to increase hours setting (hold for fast increasing) press to increase hours setting (hold for fast increasing)
 press to increase minutes setting (hold for fast increasing) press to increase minutes setting (hold for fast increasing)
- Press button twice
2:
  Press to display the temperature in Centigrade Press to display the temperature in Centigrade
 Press to display the temperature in Fahrenheit Press to display the temperature in Fahrenheit
- Press button thrice
3: 12 hours or 24 hours setup
  Press button to display the time in 24 hours Press button to display the time in 24 hours
 Press button to display the time in 12 hours (AM,PM) Press button to display the time in 12 hours (AM,PM)
- Press button 4 times
4: Set the time of temperature detection
  Press for temperature detection every 10 seconds Press for temperature detection every 10 seconds
 Press for temperature detection every 20 seconds (lower power consumption) Press for temperature detection every 20 seconds (lower power consumption)
- Press button 5 times
5: Change the Air filter
 Replace the new air filter, press the FAN button to set up timing count down 120 days For changing next new filter. Replace the new air filter, press the FAN button to set up timing count down 120 days For changing next new filter.
- Press button 6 times
6: Temperature of fan to be activated (fan setup)
  Press to increase (hold for fast increasing) Press to increase (hold for fast increasing)
 Press to decrease (hold for fast decreasing) Press to decrease (hold for fast decreasing)
- Pressing once to increase/decrease 1°C, adjusting range(4°C --96°C)
- Notes :
- E2C super cooler will only detect the first channel when external power has not be supplied
- LCD flashing Indicates the battery (CR2032)to be exhausted. Please change new battery.
- Temperature default of fan to be activated is 50°C in Centigrade (Fahrenheit 122°F)
- For Installation of heat sensor, please use heat-resistance tape, the sensor must attach to the hotness place of the CPU, HD, CD-ROM etc..(please see ILL.4)
- Once the air filter changing Indicated, please change the filter and reset(please refer setup Mode 5)
- Examples :
- Control the CPU cooler(Please See ILL.5)
- Computer system(please See ILL.6)
- External SCS1 BOX(Please See ILL.7)
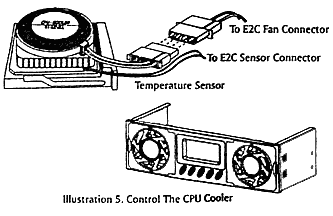 
|

